Un peu de plaisir avec la vision par ordinateur et CNN avec une petite base de données.
, CNN, , . , , . , Spot it! ( , ).
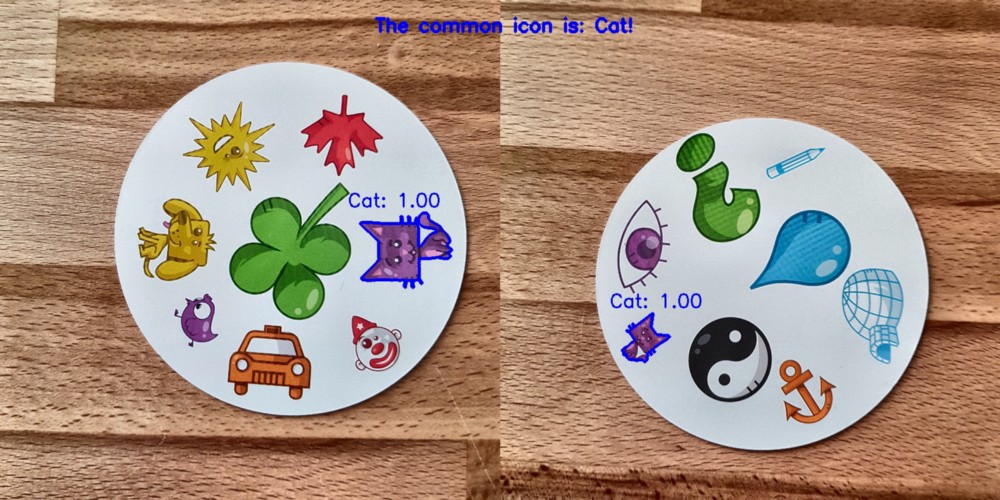
, , : , . Spot it!, . . , . 55 , , .
?
data science . , . 330 . . : (CNN)? !
, , ? , : . , . . , : , ( ) ( ) , ( ) ( ) . .
Lab . L , a , b — . OpenCV:
import cv2
import imutils
imgname = 'picture1'
image = cv2.imread(f’{imgname}.jpg’)
lab = cv2.cvtColor(image, cv2.COLOR_BGR2LAB)
l, a, b = cv2.split(lab)
, :
clahe = cv2.createCLAHE(clipLimit=3.0, tileGridSize=(8,8))
cl = clahe.apply(l)
limg = cv2.merge((cl,a,b))
final = cv2.cvtColor(limg, cv2.COLOR_LAB2BGR)
:
resized = cv2.resize(final, (800, 800))
#
cv2.imwrite(f'{imgname}processed.jpg', blurred)
!
. OpenCV. -, ( , 190), . :
image = cv2.imread(f’{imgname}processed.jpg’)
gray = cv2.cvtColor(image, cv2.COLOR_RGB2GRAY)
thresh = cv2.threshold(gray, 190, 255, cv2.THRESH_BINARY)[1]
#
cnts = cv2.findContours(thresh.copy(), cv2.RETR_EXTERNAL, cv2.CHAIN_APPROX_SIMPLE)
cnts = imutils.grab_contours(cnts)
output = image.copy()
#
for c in cnts:
cv2.drawContours(output, [c], -1, (255, 0, 0), 3)
, , : . , .
# ,
cnts = sorted(cnts, key=cv2.contourArea, reverse=True)[0]
#
mask = np.zeros(gray.shape,np.uint8)
mask = cv2.drawContours(mask, [cnts], -1, 255, cv2.FILLED)
#
fg_masked = cv2.bitwise_and(image, image, mask=mask)
# ( )
mask = cv2.bitwise_not(mask)
bk = np.full(image.shape, 255, dtype=np.uint8)
bk_masked = cv2.bitwise_and(bk, bk, mask=mask)
#
final = cv2.bitwise_or(fg_masked, bk_masked)
! , — . , . :
# ( )
gray = cv2.cvtColor(final, cv2.COLOR_RGB2GRAY)
thresh = cv2.threshold(gray, 195, 255, cv2.THRESH_BINARY)[1]
thresh = cv2.bitwise_not(thresh)
cnts = cv2.findContours(thresh.copy(), cv2.RETR_EXTERNAL, cv2.CHAIN_APPROX_SIMPLE)
cnts = imutils.grab_contours(cnts)
cnts = sorted(cnts, key=cv2.contourArea, reverse=True)[:10]
#
i = 0
for c in cnts:
if cv2.contourArea(c) > 1000:
# ,
mask = np.zeros(gray.shape, np.uint8)
mask = cv2.drawContours(mask, [c], -1, 255, cv2.FILLED)
#
fg_masked = cv2.bitwise_and(image, image, mask=mask)
mask = cv2.bitwise_not(mask)
bk = np.full(image.shape, 255, dtype=np.uint8)
bk_masked = cv2.bitwise_and(bk, bk, mask=mask)
finalcont = cv2.bitwise_or(fg_masked, bk_masked)
#
output = finalcont.copy()
x,y,w,h = cv2.boundingRect(c)
# squares io rectangles
if w < h:
x += int((w-h)/2)
w = h
else:
y += int((h-w)/2)
h = w
#
roi = finalcont[y:y+h, x:x+w]
roi = cv2.resize(roi, (400,400))
#
cv2.imwrite(f"{imgname}_icon{i}.jpg", roi)
i += 1
! . , , 57 ( 57 ). :
symbols ├── test │ ├── anchor │ ├── apple │ │ ... │ └── zebra ├── train │ ├── anchor │ ├── apple │ │ ... │ └── zebra └── validation ├── anchor ├── apple │ ... └── zebra
, ( 2500)! , GitHub. , …
(CNN)
. . softmax 57 .
:
#
from keras import layers
from keras import models
from keras import optimizers
from keras.preprocessing.image import ImageDataGenerator
import matplotlib.pyplot as plt
# , 57 ( )
model = models.Sequential()
model.add(layers.Conv2D(32, (3, 3), activation='relu', input_shape=(400, 400, 3)))
model.add(layers.MaxPooling2D((2, 2)))
model.add(layers.Conv2D(64, (3, 3), activation='relu'))
model.add(layers.MaxPooling2D((2, 2)))
model.add(layers.Conv2D(128, (3, 3), activation='relu'))
model.add(layers.MaxPooling2D((2, 2)))
model.add(layers.Conv2D(256, (3, 3), activation='relu'))
model.add(layers.MaxPooling2D((2, 2)))
model.add(layers.Conv2D(256, (3, 3), activation='relu'))
model.add(layers.MaxPooling2D((2, 2)))
model.add(layers.Conv2D(128, (3, 3), activation='relu'))
model.add(layers.Flatten())
model.add(layers.Dropout(0.5))
model.add(layers.Dense(512, activation='relu'))
model.add(layers.Dense(57, activation='softmax'))
model.compile(loss='categorical_crossentropy', optimizer=optimizers.RMSprop(lr=1e-4), metrics=['acc'])
. — . , , , . Keras:
#
train_dir = 'symbols/train'
validation_dir = 'symbols/validation'
test_dir = 'symbols/test'
# ImageDataGenerator Keras ( )
train_datagen = ImageDataGenerator(rescale=1./255, rotation_range=40, width_shift_range=0.1, height_shift_range=0.1, shear_range=0.1, zoom_range=0.1, horizontal_flip=True, vertical_flip=True)
test_datagen = ImageDataGenerator(rescale=1./255)
train_generator = train_datagen.flow_from_directory(train_dir, target_size=(400,400), batch_size=20, class_mode='categorical')
validation_generator = test_datagen.flow_from_directory(validation_dir, target_size=(400,400), batch_size=20, class_mode='categorical')
, :
, .
history = model.fit_generator(train_generator, steps_per_epoch=100, epochs=100, validation_data=validation_generator, validation_steps=50)
#
model.save('models/model.h5')
, , . :
, . ( ) . .
: . , 0,995 .
. , , , . :
- : .
( ).
. ( ).
GitHub , main.py.
:
? , ! , . ! :
? : , ! : 55 . 1485 . 140 . , !
Je ne pense pas qu'il soit vraiment difficile de créer un modèle à 100%. Cela peut être fait en utilisant l'apprentissage par transfert, par exemple. Pour comprendre ce que fait le modèle, nous pouvons rendre les couches pour l'image de test. Quoi essayer la prochaine fois!
J'espère que vous avez aimé lire cet article! ❤